StackOverflow May 2016 Contributions

Below are links to questions I have contributed to on StackOverflow.  If you have time or any of the questions interest you take a moment to review the question and answers.  If you feel one of the answers appropriately answer the question, then please vote that answer up to better serve the community and future users looking for an answer to a similar question.

Accessing the Office 365 Reporting Service using C#

Introduction

As with other cloud offerings from Microsoft, there is so much data and meta data being collected there is often a need for reporting on that information.  Within Office 365 administration portal you can see the various reports that are offered, however it may be necessary to pull that data into your own application or reporting tool.  Thankfully you can access that underlying data through Powershell commandlets or by using the Office 365 Reporting service.  This post will focus on a few simple example methods I used to explore the Office 365 Reporting service using C#.

Prerequisites

Visual Studio

I have uploaded the full source to github so I will not be posting the full example methods in this post, if you would like to download the full source you can get it here.  Each method has local variables for your Office 365 administrator account username and password.  One of the example methods I would like to highlight is the run_all_reports method.  This was probably the most helpful method when exploring the different reports.  This allowed me to quickly loop through each report available and dump the first set of results to an xml file.  I could then inspect each report result to see what data was available and which report data I needed to pull into my own application.

public void run_all_reports()
{
    var username = "";
    var password = "";

    foreach (var report in Reports.ReportList)
    {
        var ub = new UriBuilder("https", "reports.office365.com");
        ub.Path = string.Format("ecp/reportingwebservice/reporting.svc/{0}", report);
        var fullRestURL = Uri.EscapeUriString(ub.Uri.ToString());
        var request = (HttpWebRequest)WebRequest.Create(fullRestURL);
        request.Credentials = new NetworkCredential(username, password);

        try
        {
            var response = (HttpWebResponse)request.GetResponse();
            var encode = System.Text.Encoding.GetEncoding("utf-8");
            var readStream = new StreamReader(response.GetResponseStream(), encode);
            var doc = new XmlDocument();
            doc.LoadXml(readStream.ReadToEnd());

            doc.Save($@"C:\Office365\Reports\{DateTime.Now:yyyyMMdd}_{report}.xml");

            Console.WriteLine("Saved: {0}", report);
        }
        catch (Exception ex)
        {
            Console.WriteLine(ex.Message);
        }
    }
}

The get_report_list method simple hits the service endpoint and grabs the definition of all the available reports in the api.  Note that depending on your permission level you may not see all the reports available.  Finally, the run_report_messagetrace method is an example of pulling one report and mapping it back to an object using the HttpClient and Newtonsoft Json libraries.

Conclusion

With any cloud offering today there will generally be some reporting capabilities built in, however these reports are usually not enough.  Luckily more and more services are exposing their source data through api’s.  The Office 365 reporting service is just one example of that and from the sample methods above you can see how quickly it is to get access to this data.

Get All Users from Oracle RightNow SOAP Api with C#

Introduction

This post will be another example from my various system integration work.  Like in a previous post about getting users from the jira api, here I will give a simple example of utilizing the RightNow SOAP Api to get a list of all users.  RightNow does have a REST Api, however I have no control over the instance I must integrate with and unfortunately it is disabled.  It has certainly been a bit challenging extracting data from the RightNow Api, hopefully this example will be a simple jumping off point to help you explore the other objects in the api.  Here is a link to the documentation I have used when accessing the RightNow SOAP Api.

Prerequisites

Visual Studio

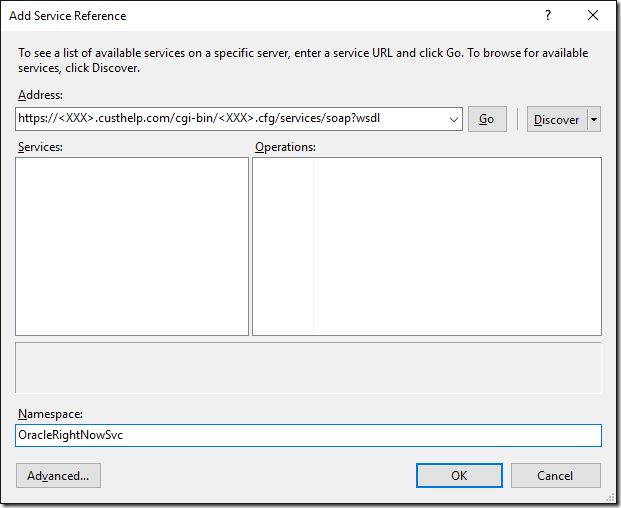
Once you have a new console app created, the first thing you will want to do since this is a SOAP Api, is right click on references and Add Service Reference (Gasp! Can’t remember the last time I did that).
SvcReference

Enter the address of the Oracle RightNow instance you need to connect to, replacing <XXX> in the url https://<XXX>.custhelp.com/cgi-bin/<XXX>.cfg/services/soap?wsdl.

Now that we have the service reference we can begin making queries against the SOAP API.  There are methods available to fetch data from the api, the object query or tabular query.  In this example I could have used the object query because it is a simple query, however I always use the tabular query (CSV Query) because the tabular query allows for more complicated ROQL queries.  In general, you will most likely be writing more complicated queries to gather data anyway.

public static void GetUsers()
{
	var _client = new RightNowSyncPortClient();

	_client.ClientCredentials.UserName.UserName = "";
	_client.ClientCredentials.UserName.Password = "";

	ClientInfoHeader clientInfoHeader = new ClientInfoHeader();
	clientInfoHeader.AppID = "CSVUserQuery";

	var queryString = @"SELECT
							Account.ID,
							Account.LookupName,
							Account.CreatedTime,
							Account.UpdatedTime,
							Account.Country,
							Account.Country.Name,                                    
							Account.DisplayName,
							Account.Manager,
							Account.Manager.Name,
							Account.Name.First,
							Account.Name.Last                                    
						 FROM Account;";


	try
	{
		byte[] csvTables;

		CSVTableSet queryCSV = _client.QueryCSV(clientInfoHeader, queryString, 10000, ",", false, true, out csvTables);

		var dataList = new List();
		foreach (CSVTable table in queryCSV.CSVTables)
		{
			System.Console.WriteLine("Name: " + table.Name);
			System.Console.WriteLine("Columns: " + table.Columns);
			String[] rowData = table.Rows;

			foreach (String data in rowData)
			{
				dataList.Add(data);
				System.Console.WriteLine("Row Data: " + data);
			}
		}


		//File.WriteAllLines(@"C:\Accounts.csv", dataList.ToArray());


		Console.ReadLine();
	}
	catch (FaultException ex)
	{
		Console.WriteLine(ex.Code);
		Console.WriteLine(ex.Message);
	}
	catch (SoapException ex)
	{
		Console.WriteLine(ex.Code);
		Console.WriteLine(ex.Message);
	}
}

In the RightNow API the Account object represents the user in the system.  The first step here is to setup the soap service client, by passing in the credentials in order to authenticate with the soap service.  Once the client is configured to make the call you pass in a query for the object you would like to get back in CSV format, in this case the Account object.  Once the result comes back you can iterate through the rows within the table.

Also note that the result is a CSVTableSet this is important because you can define a query with multiple statements, this will return a result table for each statement.

An example might be something like this:

            var queryString = @"SELECT
                                    Account.ID,
                                    Account.LookupName,
                                    Account.CreatedTime,
                                    Account.UpdatedTime,
                                    Account.Country,
                                    Account.Country.Name,                                    
                                    Account.DisplayName,
                                    Account.Manager,
                                    Account.Manager.Name,
                                    Account.Name.First,
                                    Account.Name.Last                                    
                                 FROM Account;
                                SELECT 
                                    Account.ID, 
                                    Emails.EmailList.Address,
                                    Emails.EmailList.AddressType,
                                    Emails.EmailList.AddressType.Name,
                                    Emails.EmailList.Certificate,
                                    Emails.EmailList.Invalid                                    
                                 FROM Account;
                                SELECT 
                                    Account.ID, 
                                    Phones.PhoneList.Number,
                                    Phones.PhoneList.PhoneType,
                                    Phones.PhoneList.PhoneType.Name,
                                    Phones.PhoneList.RawNumber                                                                      
                                 FROM Account;";

Conclusion

Getting the users from the Oracle RightNow api is a simple example to get up and running, while also getting some exposure to ROQL and the api.

Getting All Kendo UI Grid Columns to Fit on the PDF Export and Print

Problem

Recently while working on a web application using Kendo UI, a feature request for a simple columnar printable report came in.  Instead of trying to use crystal reports, I figured I would use the pdf exporting capabilities that reside in Kendo UI.  More specifically the ability to directly export a pdf from the Kendo UI grid control.  This is actually pretty simple to do based on the provided examples from kendo site, so I will not go into that here.  What I would like to provide in this post is some simple guidance on how to handle exporting the Kendo UI grid when the amount or size of the columns do not fit on a standard size piece of paper.  You will notice that this is an issue when you export the grid to pdf and some of the columns might be cut off.

Here is an example of a grid with the pdf export enabled:

    @(Html.Kendo()
        .Name("grid")
        .ToolBar(tools => tools.Pdf())
        .Pdf(pdf => pdf
            .AllPages()
            .PaperSize("A4")
            .Scale(0.8)
            .Margin("2cm", "1cm", "1cm", "1cm")
            .Landscape()
            .FileName("Kendo UI Grid Export.pdf")
        )
        .Columns(columns =>
        {
            columns.Bound(c => c.ContactTitle);
            columns.Bound(c => c.CompanyName);
            columns.Bound(c => c.Country).Width(150);
        })
        .Pageable(pageable => pageable
            .Refresh(true)
            .PageSizes(true)
            .ButtonCount(5))
        .DataSource(dataSource => dataSource
            .Ajax()
            .Read(read => read.Action("Customers_Read", "Grid"))
            .PageSize(20)
        )
    )

Solution

The key piece of this is options for configuring the pdf export, and specifically the PaperSize option.  What is not immediately apparent from the examples is that you do not have to put in the standard paper size names i.e. A4.  You can just define the width and height in your desired units i.e. 8.5 inches by 11 inches, that would look like PaperSize(“8.5in”, “11in”).  The secret here is that you can type in any width and height that you want i.e. PaperSize(“30in”, “20in”).  I happened to settle on 30in by 20in for my particular grid, this will not be the same for you.  Based on the number of columns and how wide the columns are this is all trial and error.  I will note there is also a Scale option that does have the desired result of scaling the entire grid down to fit on the page, this would work in an instance where the current columns you have already almost fit.  If you are in a situation like mine where you have a large number of columns or columns which need to be widened because of data length, then the best option I have found is to adjust the paper size.  Lastly I would recommend setting actual widths on all of the columns it stops the columns without widths from auto growing and allows you to adjust the PaperSize without the column widths constantly changing.

Why does this work?

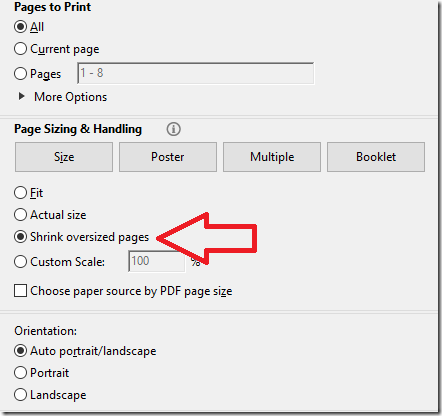
Even though you now have a pdf that is in no standard size and basically impossible to print on a home printer, when you attempt to print this pdf there is an option to Shrink oversized pages.

PrinterPref

This option essential also applies a scaling to the pdf to allow it to print on standard paper sizes.  Keep in mind the larger the pdf you export the smaller the font will be.  This is why it is a trial and error process.  You will need to repeatedly adjust and readjust the PaperSize to see what works best for the report to be readable once printed.

StackOverflow April 2016 Contributions

Below are links to questions I have contributed to on StackOverflow.  If you have time or any of the questions interest you take a moment to review the question and answers.  If you feel one of the answers appropriately answer the question, then please vote that answer up to better serve the community and future users looking for an answer to a similar question.

Accessing Salesforce Reports and Dashboards REST API Using C#

Introduction

If you have read any of my other posts, you know I have been doing work with the Salesforce REST API.  I recently had a need to access the Salesforce Reports and Dashboards REST API using C#.  While spiking out a simple example to access the Reports and Dashboards REST API I did not come across very much documentation on how to accomplish this.  In this post I will walk through a quick spike on how to authenticate with the api and how to call it to get a report.  Full code sample can be found Here on GitHub.

Prerequisites

Visual Studio

With any access to a Salesforce API you will need a user account (username, password, token) and the consumer key/secret combination from the custom connected app.  With these pieces of information, we can begin by creating a simple console application to spike out access to the reports and dashboards api.  Next we need to install the following nuget packages:

Once these packages are installed we can utilize them to create a function to access the Salesforce reports and dashboards api.

 
var sf_client = new Salesforce.Common.AuthenticationClient();
sf_client.ApiVersion = "v34.0";
await sf_client.UsernamePasswordAsync(consumerKey, consumerSecret, username, password + usertoken, url);

Here we are taking advantage of some of the common utilities in the DeveloperForce package to create an authclient which will get us our access token from the Salesforce api.  We will need that token next to start making requests to the api.  Unfortunately, the DeveloperForce library does not have the ability to call the reports and dashboards api, we are just using it here easily get the access token.  This all could be done using RestSharp but its simpler to utilize what has already been built.

                               
string reportUrl = "/services/data/" + sf_client.ApiVersion + "/analytics/reports/" + reportId;

var client = new RestSharp.RestClient(sf_client.InstanceUrl);
var request = new RestSharp.RestRequest(reportUrl, RestSharp.Method.GET);
request.AddHeader("Authorization", "Bearer " + sf_client.AccessToken);
var restResponse = client.Execute(request);
var reportData = restResponse.Content;

Since we have used the DeveloperForce package to setup the authentication we can now use RestSharp and the access token to query the report api.  In the code above we setup a RestSharp client with the Salesforce url, followed by defining the actual request for the report we want to execute.  To make the request we also need to push the Salesforce access token onto the header and now we can make the request to receive the report data.

Conclusion

As described this is a pretty simple example on how to accomplish authentication and requesting a report from the Salesforce reports and dashboards rest api using c#.  Hopefully this can be a jumping off point for accessing this data.  The one major limitation for me is the api only returns 2,000 records, this is especially frustrating if your Salesforce org has a lot of data.  In the near future I will be writing a companion post on how to get around this limitation.

Error 40197 Error Code 4815 Bulk Insert into Azure SQL Database

I have been working on a large scale ETL project, one of the data sources I regularly pull data from is Salesforce.  If anyone has worked with Salesforce they know it can be a free for all with object field changes.  This alone makes pulling data regularly from the Salesforce REST API difficult since there can be so much activity with the objects.  Not to mention the fact that the number of custom fields that can be added to a single object ranges into the hundreds.  With these factors in play it can be a daunting task to debug errors when they inevitably crop up.

During a recent run of my process I started to receive the following error:

Error 40197 The service has encountered an error processing your request. Please try again. Error code 4815. A severe error occurred on the current command. The results, if any, should be discarded.

Here is a list of error codes however it was not too helpful in my situation: SQL error codes

In my ETL process I am using Entity Framework and EntityFramework.BulkInsert-ef6, so I am doing bulk inserts into my Azure SQL Database.  Since I know there is a good chance there was a change with the object definition in Salesforce that could be the cause of this error that is where I started to investigate.  As it turns out one of the fields length was changed from 40 to 60, which means the original table I have created with a column size varchar(40) is going to have a problem.  In my case this error happened when the amount of data was larger then the field size definition in the table.  Hopefully this post will give someone else another troubleshooting avenue for this error.

Upgrading to Microsoft.Azure.Management.DataLake.Store 0.10.1-preview to Access Azure Data Lake Store Using C#

Introduction

Microsoft recently released a new nuget package to programmatically access the Azure Data Lake Store.  In a previous post Accessing Azure Data Lake Store from an Azure Data Factory Custom .Net Activity I am utilizing Microsoft.Azure.Management.DataLake.StoreFileSystem 0.9.6-preview to programmatically access the data lake using C#.  In this post I will go through what needs to be changed with my previous code to upgrade to the new nuget package.  I will also include a new version of the DataLakeHelper class which uses the updated sdk.

Upgrade Path

Since I already have a sample project utilizing the older sdk (Microsoft.Azure.Management.DataLake.StoreFileSystem 0.9.6-preview), I will use that as an example on what needs to be modified to use the updated nuget package (Microsoft.Azure.Management.DataLake.Store 0.10.1-preview).

The first step is to remove all packages which supported the obsolete sdk.  Here is the list of all packages that can be removed:

  • Hyak.Common
  • Microsoft.Azure.Common
  • Microsoft.Azure.Common.Dependencies
  • Microsoft.Azure.Management.DataLake.StoreFileSystem
  • Microsoft.Bcl
  • Microsoft.Bcl.Async
  • Microsoft.Bcl.Build
  • Microsoft.Net.Http

All of these dependencies are needed when using the DataLake.StoreFileSystem package.  In my previous sample I am also using Microsoft.Azure.Management.DataFactories in order to create a custom activity for Azure Data Factory, unfortunately this package has a dependency on all of the above packages as well.  Please be careful removing these packages as your own applications might have other dependencies on those listed above.  In order to show that these packages are no longer needed my new sample project is just a simple console application using the modified DataLakeHelper class, which can be found here on github.

Now let’s go through the few changes that need to be made to the DataLakeHelper class in order to use the new nuget package.  The following functions from the original DataLakeHelper class will need to be modified:

create_adls_client()
execute_create(string path, MemoryStream ms)
execute_append(string path, MemoryStream ms)

Here is the original code for create_adls_client():

 private void create_adls_client()
        {
            var authenticationContext = new AuthenticationContext($"https://login.windows.net/{tenant_id}");
            var credential = new ClientCredential(clientId: client_id, clientSecret: client_key);
            var result = authenticationContext.AcquireToken(resource: "https://management.core.windows.net/", clientCredential: credential);

            if (result == null)
            {
                throw new InvalidOperationException("Failed to obtain the JWT token");
            }

            string token = result.AccessToken;

            var _credentials = new TokenCloudCredentials(subscription_id, token);
            inner_client = new DataLakeStoreFileSystemManagementClient(_credentials);
        }

In order to upgrade to the new sdk, there are 2 changes that need to be made.

  1. The DataLakeStoreFileSystemManagementClient requires a ServiceClientCredentials object
  2. You must set the azure subscription id on the newly created client

The last 2 lines should now look like this:

var _credentials = new TokenCredentials(token);
inner_client = new DataLakeStoreFileSystemManagementClient(_credentials);
inner_client.SubscriptionId = subscription_id;

Now that we can successfully authenticate again with the Azure Data Lake Store, the next change is to the create and append methods.

Here is the original code for execute_create(string path, MemoryStream ms) and execute_append(string path, MemoryStream ms):

 private AzureOperationResponse execute_create(string path, MemoryStream ms)
        {
            var beginCreateResponse = inner_client.FileSystem.BeginCreate(path, adls_account_name, new FileCreateParameters());
            var createResponse = inner_client.FileSystem.Create(beginCreateResponse.Location, ms);
            Console.WriteLine("File Created");
            return createResponse;
        }

        private AzureOperationResponse execute_append(string path, MemoryStream ms)
        {
            var beginAppendResponse = inner_client.FileSystem.BeginAppend(path, adls_account_name, null);
            var appendResponse = inner_client.FileSystem.Append(beginAppendResponse.Location, ms);
            Console.WriteLine("Data Appended");
            return appendResponse;
        }

The change for both of these methods is pretty simple, the BeginCreate and BeginAppend methods are no longer available and the new Create and Append methods now take in the path and Azure Data Lake Store account name.

With the changes applied the new methods are as follows:

        private void execute_create(string path, MemoryStream ms)
        {
            inner_client.FileSystem.Create(path, adls_account_name, ms, false);
            Console.WriteLine("File Created");
        }

        private void execute_append(string path, MemoryStream ms)
        {
            inner_client.FileSystem.Append(path, ms, adls_account_name);
            Console.WriteLine("Data Appended");
        }

Conclusion

As you can see it was not difficult to upgrade to the new version of the sdk.  Unfortunately, since these are all preview bits changes like this can happen, hopefully this sdk has found its new home and it won’t go through too many more breaking changes for the end user.

StackOverflow March 2016 Contributions

Below are links to questions I have contributed to on StackOverflow.  If you have time or any of the questions interest you take a moment to review the question and answers.  If you feel one of the answers appropriately answer the question, then please vote that answer up to better serve the community and future users looking for an answer to a similar question.

Get All Users from JIRA REST API with C#

Introduction

I have been doing a lot of work integrating with various systems, which leads to the need to utilize many varying api’s.  One common data point I inevitably need to pull from the target system is a list of all users.  I have recently been working with the JIRA REST API and unfortunately there is no single method to get a list of all users.  In this post I will provide a simple example in C# utilizing the /rest/api/2/user/search method to gather the list of users.

Prerequisites

Visual Studio

First create a simple user object to model the json data being returned from the api.

    public class User
    {
        public bool Active { get; set; }
        public string DisplayName { get; set; }
        public string EmailAddress { get; set; }
        public string Key { get; set; }

        public string Locale { get; set; }
        public string Name { get; set; }
        public string Self { get; set; }
        public string TimeZone { get; set; }
    }

Next we create a simple wrapper around the jira client provided by the Atlassian SDK.

The Jira client has built in functions mostly for getting issues or projects from the api.  Luckily it exposes the underlying rest client so you can execute any request you want against the jira api.  In the GetAllUsers method I am making a request to user/search?username={item}  while iterating through the alphabet.  This request will search the username, name or email address of the user object in jira.  Since a username will likely contain more than one letter, as the results come back for each request there will be duplicates, so we have to check to make sure the user in the result set is not already in our list.  Clearly this is not going to be the most performant method, however there is no other way to gather a full list of all users.  Finally, we can create the jira helper wrapper and invoke the GetAllUsers method.

class Program
{
        static void Main(string[] args)
        {         
            var helper = new JiraApiHelper();
            var users = helper.GetAllUsers();
	}
}

Conclusion

As I stated above this solution is not going to be performant, especially if the Jira instance has a large number of users.  However, if the need is to get the entire universe of users for the Jira instance then this is one approach that accomplishes that goal.