Introduction
Over the past few weeks I have been doing some work with ASP.Net Core Web Api project’s using swagger. The setup was pretty standard until the api’s needed to be deployed to staging and production environments. The web api’s are being hosted in docker containers behind a reverse proxy, the staging and production environments required a prefix route parameter for each api. This meant that the default url’s for the controllers and swagger would need to include a route prefix. To add a route prefix to swagger and swagger ui is a pretty quick code change.
Prerequisites
- Visual Studio (Here)
- .Net Core Web Api App
- Nuget: Swashbuckle.AspNetCore
Visual Studio
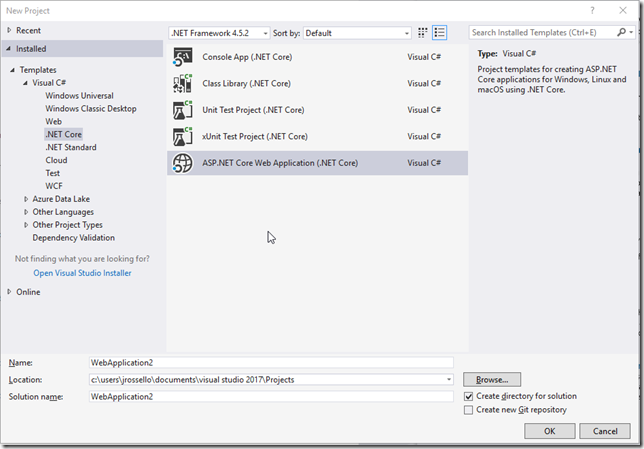
To get a ASP.Net Core Web Api up and running, create a new project and select ASP.Net Core Web Application (.Net Core).
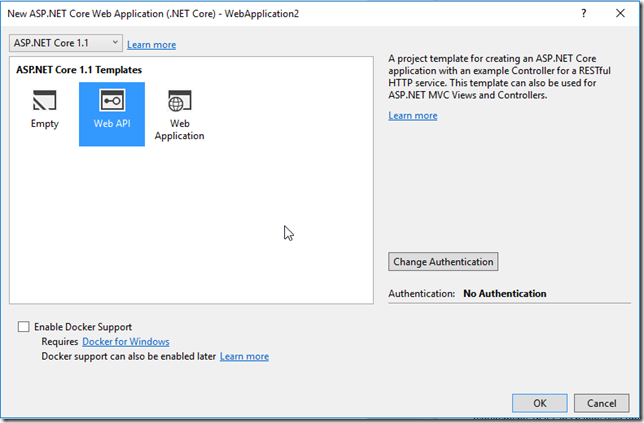
Then select which web application template to use:
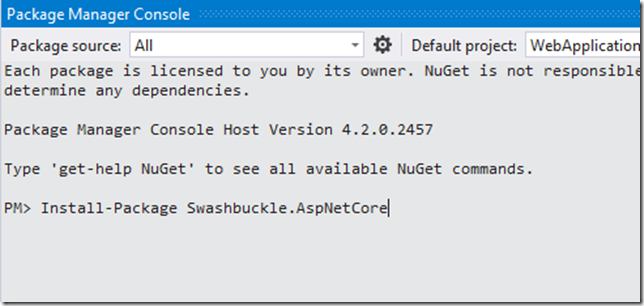
Once the project is created you will nuget in Swashbuckle.AspNetCore:
If you have done the above or already had an existing application, the standard setup in the Startup class to get swagger and swagger ui running would look something like this:
public class Startup
    {
        public Startup(IHostingEnvironment env)
        {
            var builder = new ConfigurationBuilder()
                .SetBasePath(env.ContentRootPath)
                .AddJsonFile("appsettings.json", optional: false, reloadOnChange: true)
                .AddJsonFile($"appsettings.{env.EnvironmentName}.json", optional: true)
                .AddEnvironmentVariables();
            Configuration = builder.Build();
        }

        public IConfigurationRoot Configuration { get; }

        // This method gets called by the runtime. Use this method to add services to the container.
        public void ConfigureServices(IServiceCollection services)
        {
            // Add framework services.
            services.AddMvc();

            services.AddSwaggerGen(c =>
            {
                c.SwaggerDoc("v1", new Info { Title = "Sample API", Version = "v1" });
                var basePath = PlatformServices.Default.Application.ApplicationBasePath;
                var xmlPath = Path.Combine(basePath, "SampleApi.xml");
                c.IncludeXmlComments(xmlPath);
            });
        }

        // This method gets called by the runtime. Use this method to configure the HTTP request pipeline.
        public void Configure(IApplicationBuilder app, IHostingEnvironment env, ILoggerFactory loggerFactory)
        {
            loggerFactory.AddConsole(Configuration.GetSection("Logging"));
            loggerFactory.AddDebug();

            app.UseMvc();

            app.UseSwagger();

            app.UseSwaggerUI(c =>
                c.SwaggerEndpoint("/swagger/v1/swagger.json", "Sample API")
            );

        }
    }
This would allow you to reach the swagger json at http://localhost/swagger/v1/swagger.json or swagger ui at http://localhost/swagger.
To add a route prefix to both the swagger and swagger ui endpoints, you need to set a few properties on both the app.UseSwagger() middleware and app.UseSwaggerUI() middleware.
app.UseSwagger() changes:
 app.UseSwagger(c =>
 {
      c.RouteTemplate = "SampleApi/swagger/{documentName}/swagger.json";
 });
app.UseSwaggerUI() changes:
 app.UseSwaggerUI(c =>
 {
      c.SwaggerEndpoint("/SampleApi/swagger/v1/swagger.json", "Sample API");
      c.RoutePrefix = "SampleApi/swagger";
 });
After making this change you will be able to hit the swagger and swagger ui endpoints from the new url with the route prefix. This is a pretty simple change, hopefully this will save someone from searching for how to do this and only finding the previous ways of changing the swagger url.


