Introduction
I have written a few posts about different aspects of Azure Data Factory. I use it as the main workhorse of my data integration and ETL projects. One major drawback I have found with Azure Data Factory is the scheduling system, it’s not as flexible as I and many others would like it to be. With that being said there are certainly ways to adapt and get more control of an Azure Data Factory pipeline execution. In my post Starting an Azure Data Factory Pipeline from C# .Net, I outline the need to kick off a pipeline after a local job has completed and how this can be attained by utilizing the SDK to programmatically set the pipelines Start/End dates. You may not have that requirement specifically, but let’s say you want to only run a pipeline during the weekday or another specific schedule, this can be accomplished by utilizing the same code from my prior post and scheduling a local console app. However, I thought it would be more fun to utilize Azure Functions to kick off a pipeline on a weekday schedule to provide a fully cloud based solution.
Prerequisites
- You will need an Azure Subscription. Free Trial
- Visual Studio. Visual Studio Community 2015
- An ADF Pipeline to schedule
- Service Principal with access rights to the data factory and resource group (helpful links here and here)
Azure Function
Once you have an Azure Data Factory provisioned and provided the service principal with the appropriate access, we can now create the Azure Function to execute the pipeline. Here is the Azure Functions C# developer reference, which I used to figure out how to accomplish this task. With the Azure Function created, we will need access to the Azure Functions file system to upload files, I chose to do this using FTP, however there are multiple ways to accomplish this described in the developer reference.
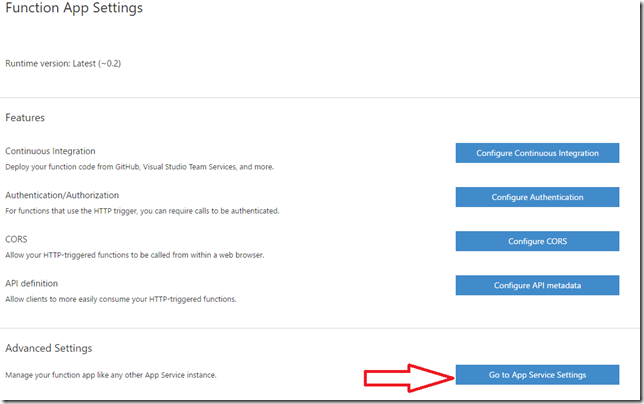
On the Azure Functions blade click the Function app settings then click Go to App Service Settings.
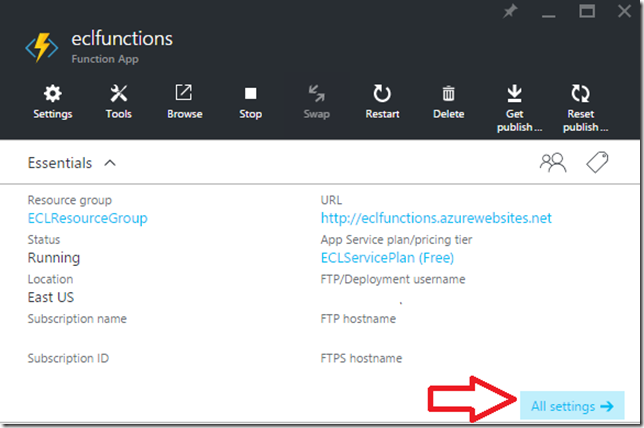
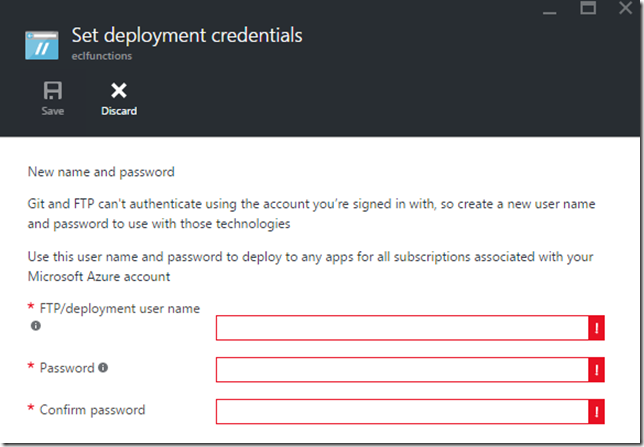
This will open the actual app settings blade of the service where you can configure FTP user access. From here you want to navigate to All Settings then Deployment Credentials and enter in a username/password to use for accessing the Azure Function folder structure.
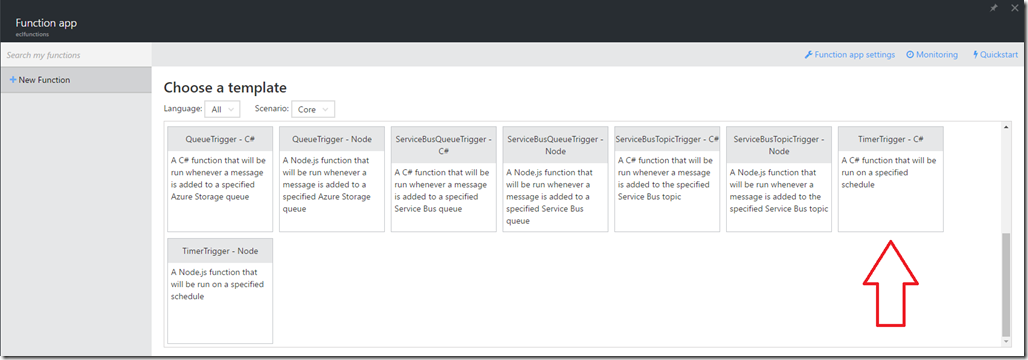
Now that we have access to the local file system we can begin creating the actual function to execute the Azure Data Factory pipeline. Back on the main Azure Function blade click New Function and select the TimerTrigger – C# function template.
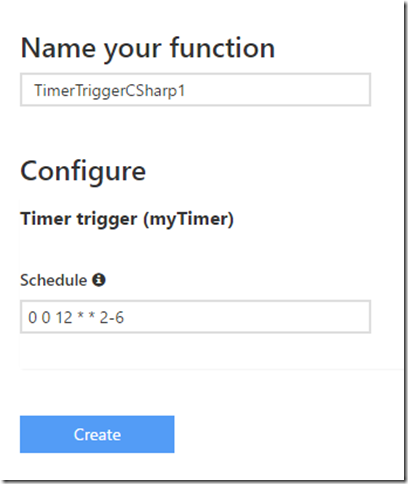
Before it will create the template you will need to fill out a name and a trigger schedule, which can be changed later from the Integrate tab of the Azure Function development window.
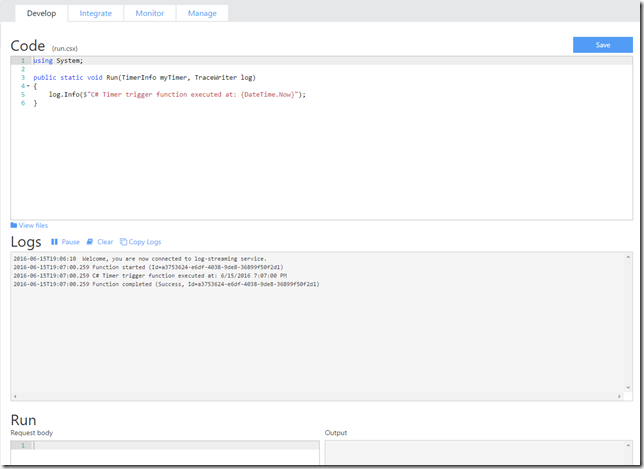
The schedule is a CRON expression defined as {second} {minute} {hour} {day} {month} {day of the week}, more information can be found here. Remember that the Azure Function is running in an environment using UTC (not sure if that can be changed). The above schedule I provided is to run the Azure Function at 12:00 PM UTC Tuesday – Saturday or in my case since I am EST the function would execute at 8:00 AM EST Tuesday – Saturday. Finally clicking the create button will bring us to the development editor for the Azure Function.
Now we are at the point where we can begin coding up the Azure Function and like anything written today in Visual Studio we will be utilizing NuGet to get the proper packages needed to interact with Azure Data Factory. In order for the Azure Function to perform a NuGet restore we will need to upload a project.json file into the file system of the Azure Function. This is where the FTP access comes into play, all Azure Functions will have a named folder under site/wwwroot/<FuncName>, this is where you will need to put the project.json file.
{
  "frameworks": {
    "net46":{
      "dependencies": {
			"Hyak.Common" : "1.1.0",
			"Microsoft.Azure.Common":"2.1.0",
			"Microsoft.Azure.Common.Dependencies":"1.0.0",
			"Microsoft.Azure.Management.DataFactories":"4.9.0",
			"Microsoft.Bcl":"1.1.10",
			"Microsoft.Bcl.Async":"1.0.168",
			"Microsoft.Bcl.Build":"1.0.21",
			"Microsoft.IdentityModel.Clients.ActiveDirectory":"3.10.305231913",
			"Microsoft.Net.Http":"2.2.29"
      }
    }
   }
}
Take the above json and save it as project.json and upload it into site/wwwroot/<FuncName> folder. Now switch back to the Azure Portal and you will notice NuGet restore activity in the Logs window of the function editor.
Restoring packages.
Starting NuGet restore
Restoring packages for D:\home\site\wwwroot\TimerTriggerCSharp1\project.json...
Committing restore...
Writing lock file to disk. Path: D:\home\site\wwwroot\TimerTriggerCSharp1\project.lock.json
D:\home\site\wwwroot\TimerTriggerCSharp1\project.json
Restore completed in 1925ms.
Now that the proper packages have been restored we will be able to utilize the Data Factory SDK to control the pipeline execution programmatically. Copy and paste the following code into the function editor Code window. Fill in the appropriate information for ALL variables set to an empty string at the top of the method. If you viewed my previous post this is the same method, I used when kicking off the data factory at the end of a local process.
#r "System.Runtime"
#r "System.Threading.Tasks"

using System;
using System.Net;
using System.Threading.Tasks;
using Newtonsoft.Json;
using Microsoft.Azure;
using Microsoft.Azure.Management.DataFactories;
using Microsoft.Azure.Management.DataFactories.Models;
using Microsoft.IdentityModel.Clients.ActiveDirectory;

public static void Run(TimerInfo myTimer, TraceWriter log)
{
    var activeDirectoryEndpoint = "https://login.windows.net/";
    var resourceManagerEndpoint = "https://management.azure.com/";
    var windowsManagementUri = "https://management.core.windows.net/";
    var subscriptionId = "";
    var activeDirectoryTenantId = "";
    var clientId = "";
    var clientSecret = "";
    var resourceGroupName = "";
    var dataFactoryName = "";
    var pipelineName = "";

    var authenticationContext = new AuthenticationContext(activeDirectoryEndpoint + activeDirectoryTenantId);
    var credential = new ClientCredential(clientId: clientId, clientSecret: clientSecret);
    var result = authenticationContext.AcquireTokenAsync(resource: windowsManagementUri, clientCredential: credential).Result;

    if (result == null) throw new InvalidOperationException("Failed to obtain the JWT token");

    var token = result.AccessToken;

    var aadTokenCredentials = new TokenCloudCredentials(subscriptionId, token);

    var resourceManagerUri = new Uri(resourceManagerEndpoint);

    var client = new DataFactoryManagementClient(aadTokenCredentials, resourceManagerUri);

    try
    {
	var slice = DateTime.Now.AddDays(-1);
        var pl = client.Pipelines.Get(resourceGroupName, dataFactoryName, pipelineName);

        pl.Pipeline.Properties.Start = DateTime.Parse($"{slice.Date:yyyy-MM-dd}T00:00:00Z");
        pl.Pipeline.Properties.End = DateTime.Parse($"{slice.Date:yyyy-MM-dd}T23:59:59Z");
        pl.Pipeline.Properties.IsPaused = false;

        client.Pipelines.CreateOrUpdate(resourceGroupName, dataFactoryName, new PipelineCreateOrUpdateParameters()
        {
            Pipeline = pl.Pipeline
        });
    }
    catch (Exception e)
    {
        log.Info(e.Message);
    }
}
Conclusion
Azure Data Factory does an amazing job of orchestrating cloud services, which I have used extensively on a daily basis. The current scheduling functionality may work for a majority of the jobs you want to create, but could use some more precision capabilities. Like my example above if you only want to run your pipeline during weekdays there is no inherent way to configure that or any other precise timeframe. Having a pipeline running constantly during hours when you know it will not be effective could be a large waste of money. This limitation of how to control the execution of a pipeline has been something I have had to work around in difference circumstances. With the use of Azure Functions, you can create a more flexible schedule for your pipelines in a completely cloud based solution.


